The short answer
Dusty condenser coils make a compressor run almost continuously. They sit behind the kick plate at the bottom front on most fridges, or on the back of older ones. Unplug first — the condenser fan starts without warning. Brush the fins with a condenser coil brush, then vacuum; brushing first is what actually loosens the dust. Clean the fan blades too, and leave 50 mm clearance at the back when you push the fridge home. Every 6 to 12 months, or every 3 with shedding pets.
Of all the maintenance jobs on a refrigerator, cleaning the condenser coils has the best return for the time it takes. It costs twenty minutes once or twice a year, and on a neglected machine it can cut the compressor’s running time noticeably.
The coils are how the fridge gets rid of heat. Refrigerant picks up heat from inside the cabinet and dumps it into the room through a run of thin tubing wrapped in fins. When those fins are blanketed in dust, pet hair and kitchen grease, the heat has nowhere to go. The compressor responds the only way it can — by running longer, and hotter, for the same result.
What a blocked coil actually looks like
- The compressor runs almost continuously instead of cycling
- The fridge or freezer struggles to hold temperature in warm weather
- The sides or back of the cabinet are hot rather than warm
- Higher electricity use with no other explanation
- A faint smell of hot dust when the machine runs
The failure mode at the end of this road is a compressor that has spent years running at elevated temperature and gives up early. Compressors are usually the point at which replacing the fridge makes more sense than repairing it.
Finding the coils
There are two layouts:
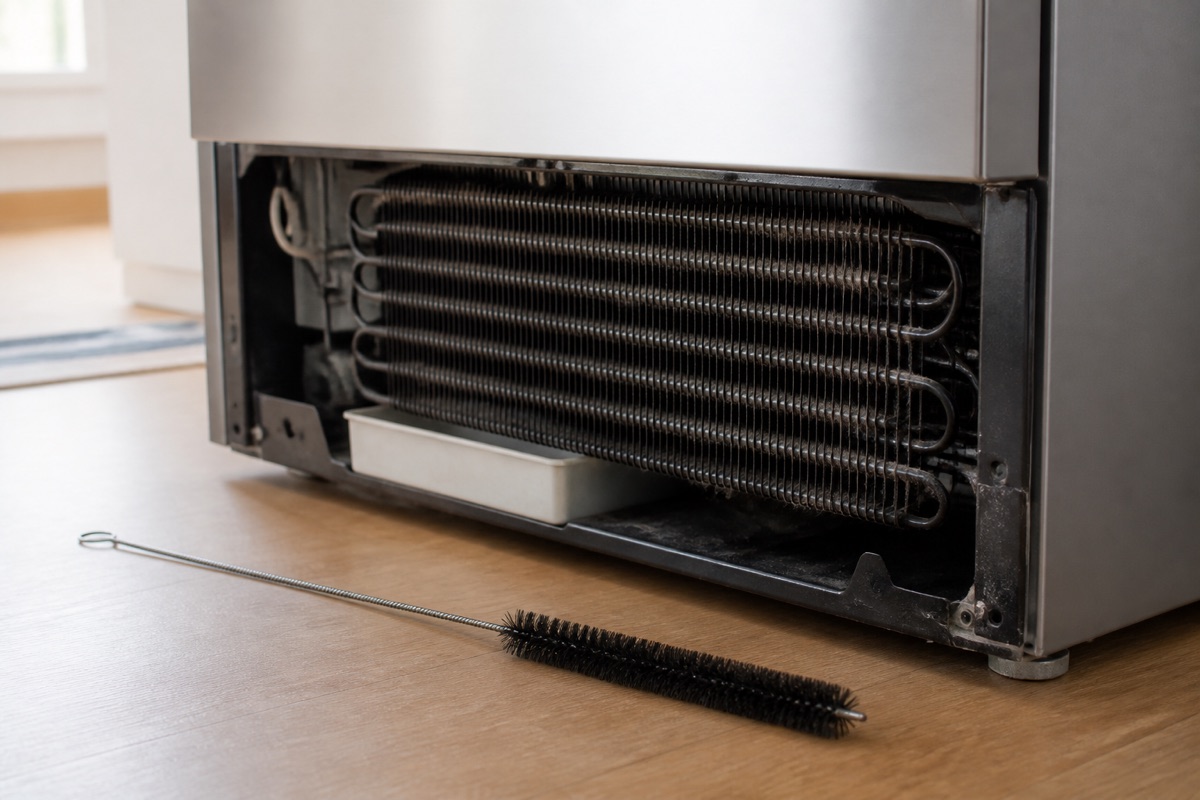
- Underneath, behind the kick plate. Standard on most refrigerators built in the last twenty-five years. A ventilated grille at the bottom front unclips or unscrews, and the coils sit horizontally behind it along with a condenser fan.
- On the back of the cabinet. Common on older units and on many compact and under-counter models. The coils are the black grid visible when you pull the fridge out.
A small number of recent models use a fully sealed, foam-encased condenser that is not user-serviceable and is marked as maintenance-free. Check the manual before you go looking; if it says nothing about cleaning coils, that is probably why.
Cleaning them
1. Unplug the refrigerator
Not optional. The condenser fan will start on its own when the compressor calls, and it starts with no warning.
2. Get the panel off
Front kick plates usually pop off with a firm pull at the bottom edge, or come away after two screws. Rear coils simply need the fridge pulled out — do this by walking it out on alternating corners rather than dragging, and mind the floor if it is vinyl or soft wood.
3. Brush first, vacuum second
A condenser coil brush — a long, thin, flexible bottle-brush — is the correct tool and costs very little. Work it between the fins along the length of the coil, then vacuum up what you have dislodged with a crevice tool.
Doing it the other way round mostly moves air past dust that is stuck. Brush loosens, vacuum removes.
Work gently. The aluminium fins bend if you lean on them, and bent fins block airflow just as effectively as dust. If some are already flattened, a fin comb will straighten them.
4. Do not forget the fan
The condenser fan sits near the compressor and pulls air across the coils. Its blades collect a felt of dust that unbalances them and cuts airflow. Wipe each blade, and clear the grille around the fan housing.
5. Wipe the floor underneath
Whatever you dislodge will end up there, and it gets pulled straight back in the next time the fan runs.
6. Reassemble and check clearance
Refit the panel, plug in, and push the fridge back — but leave the clearance the manufacturer specifies, typically 50 mm (2 in) at the back and 25 mm (1 in) at the sides and top. A fridge pushed hard against a wall re-creates the same problem you just solved.
How often
| Household | Interval |
|---|---|
| No pets, low dust | Every 12 months |
| Typical household | Every 6 months |
| Shedding pets, or a fridge in a garage or utility area | Every 3 months |
While the fridge is out
Two jobs take another five minutes and are worth doing at the same time:
- The drain pan. Under the compressor sits a shallow tray that catches defrost water and lets it evaporate. It collects sludge and is a common source of a persistent smell that people chase inside the cabinet for months. Slide it out if it is removable, wash it, dry it, put it back.
- The levelling. With the machine out, check it sits level side to side and very slightly tilted back, so the doors swing shut rather than drift open.
If cleaning does not fix it
A fridge that still runs constantly with clean coils, a working fan and clear clearance has a different fault — most often a failing door gasket, a stuck defrost heater, or low refrigerant charge. The first is worth testing yourself with the paper test. The other two need a technician, and refrigerant work legally requires a certified one in most countries.
Common questions
How do I know if my fridge even has cleanable coils?
Check the manual. Most refrigerators built in the last twenty-five years have coils behind a kick plate at the bottom front; older and compact models have them on the back. A small number of recent units use a sealed, foam-encased condenser that is not user-serviceable and is marked maintenance-free.
Brush first or vacuum first?
Brush first, then vacuum. Vacuuming alone mostly moves air past dust that is stuck between the fins. A condenser coil brush loosens it and the vacuum removes it. Work gently — bent aluminium fins block airflow as effectively as dust does.
Do I really need to unplug it?
Yes. The condenser fan starts on its own whenever the compressor calls, with no warning, and your hands will be next to it. This is not a precaution you can skip because the fridge sounds quiet.
My fridge still runs constantly after cleaning. What next?
Check the door gasket with the paper test, and confirm the condenser fan is actually turning. If both are fine, the remaining candidates are a stuck defrost heater or low refrigerant charge, and both need a technician — refrigerant work legally requires a certified one in most countries.
What clearance does a fridge need?
Typically 50 mm at the back and 25 mm at the sides and top, though check your model. Pushing a fridge hard against a wall recreates the exact airflow problem you just solved by cleaning the coils.